Google Customer Reviews and Woocommerce

Google Customer Reviews are available for selected countries now, including The Netherlands and Belgium. At the moment i’m not sure if this service should replace or extend other review services like Trustpilot and The Feedback Company.

To use the Google Customer Review service a is Google Merchant account is required.

To use this service you’ll have to add some JavaScript code to the order confirmation page of your webshop. For Woocommerce you can easily use the woocommerce_thankyou hook to add the JavaScript code. To get the required information of the order you can create a new instance of the WC_Order class inside your custom function of the hook as follows:

$order = new WC_Order( $order_id );

The WC_Order class inherit properties from WC_Abstract_Order which provide you the required information about the customer. Properties for both the customer’s e-mail address and shipping address are available.

The final code for the hook may look like that shown beneath. You can add this code in the functions.php file in your theme directory:

add_action( ‘woocommerce_thankyou’, ‘my_google_reviews’ );
function my_google_reviews( $order_id ) {

// Lets grab the order
$order = new WC_Order( $order_id );
?>
<script src=”https://apis.google.com/js/platform.js?onload=renderOptIn” async defer></script>

<script>
window.renderOptIn = function() {
window.gapi.load(‘surveyoptin’, function() {
window.gapi.surveyoptin.render(
{
“merchant_id”: 11111111,
“order_id”: “<?php echo $order_id; ?>”,
“email”: “<?php echo $order->billing_email; ?>”,
“delivery_country”: “<?php echo $order->shipping_country; ?>”,
“estimated_delivery_date”: “<?php echo my_delivery_date(); ?>”
});
});
}
</script>
<?php
}

As you can see in the above the estimated delivery date value is dynamically set by an other custom function. My custom my_delivery_date() look like that shown below:

function my_delivery_date($send_day = 1) {

if (date(‘N’) === “5” && date(“G”) >= 16) { //vrijdag
$send_day += 3;
}
elseif (date(‘N’) === “6”) { //zaterdag
$send_day += 2;
}
elseif (date(‘N’) === “7”) { //zondag
$send_day += 1;
}
elseif ( date(“G”) >= 16) {
$send_day += 1;
}
return date(‘Y-m-d’,time()+24*60*60*$send_day);
}

The above function is used for my webshops at Webvrouw.nl and Menstruatiecups.nl. For Menstrualcups.eu which has many international orders i can used the same code, after setting $send_day to for instance 3 days.

You can also use the following JavaScript code to set the language of the service.

<!– BEGIN GCR Language Code –>
<script>
window.___gcfg = {
lang: ‘nl’
};
</script>
<!– END GCR Language Code –>

Because of the same code is used to set the language of the badge, i’ve add the language code only to the footer.php file of my theme. The footer.php file also contains the JavaScript code for the Badge. The badge will look like that shown in the figure below:

Badge Google review service

Save

Bootstrap 4 and WordPress

As already mentioned in my previous post about Bootstrap 4; i have built a WordPress Starter Theme with Bootstrap 4. If you like both Bootstrap and WordPress you should really try it!

People claim that Bootstrap and WordPress don’t always match, some opinions about that can be found at When to Use Bootstrap for Your WordPress Theme (And When Not To) and Why Bootstrap is a bad fit for WordPress Themes.

The problem, Bootstrap is not pure semantic and uses predefined presentational CSS classes for layout and other markup, WordPress uses more semantical code by default, but also has its own CSS classes presentation. So Bootstrap CSS classes do not fit WordPress’ HTML code by default. Two way to fix the preceding; change the HTML output of WordPress or applies Bootstrap’s (S)CSS on the default WordPress classes. Also notice that the SCSS code of Bootstrap, Less code for earlier version had been refactored to avoid both extends and child selectors, which means the way you can use this classes become more flexible.

When changing the HTML output of WordPress, people speak about the “nav walker” thing, indeed you have to create a custom nav walker which enables you to display the Bootstrap CSS classes in the HTML code of your page navigation structures. You can download these walkers anywhere. In the JBST theme the following nav walker classes had been used:

<?php 
// Big thanks to Brett Mason (https://github.com/brettsmason) for the awesome walker
class Topbar_Menu_Walker extends Walker_Nav_Menu {

    // add main/sub classes to li's and links(&$output, $item, 
    function start_el( &$output, $item, $depth = 0, $args = array(), $id = 0) {
   
  
    // passed classes
    $classes = empty( $item->classes ) ? array() : (array) $item->classes;
    $class_names = esc_attr( implode( ' ', apply_filters( 'nav_menu_css_class', array_filter( $classes ), $item ) ) );
    
    $active = in_array('current-menu-item', $item->classes);
    $indent = ' ';
    // build html
    $output .= $indent . '<li class="nav-item">';
  
    // link attributes
    $attributes  = ! empty( $item->attr_title ) ? ' title="'  . esc_attr( $item->attr_title ) .'"' : '';
    $attributes .= ! empty( $item->target )     ? ' target="' . esc_attr( $item->target     ) .'"' : '';
    $attributes .= ! empty( $item->xfn )        ? ' rel="'    . esc_attr( $item->xfn        ) .'"' : '';
    $attributes .= ! empty( $item->url )        ? ' href="'   . esc_attr( $item->url        ) .'"' : '';
    if(in_array('current-menu-item', $item->classes)) {
      $attributes .= ' class="nav-link active"';
        $item_output = sprintf( '%1$s<a%2$s>%3$s%4$s%5$s  <span class="sr-only">(current)</span></a>%6$s',
        $args->before,
        $attributes,
        $args->link_before,
        apply_filters( 'the_title', $item->title, $item->ID ),
        $args->link_after,
        $args->after
        );
    }
    else {
      $attributes .= ' class="nav-link"';
      $item_output = sprintf( '%1$s<a%2$s>%3$s%4$s%5$s</a>%6$s',
        $args->before,
        $attributes,
        $args->link_before,
        apply_filters( 'the_title', $item->title, $item->ID ),
        $args->link_after,
        $args->after
        );
    }      

  
    // build html
    $output .= apply_filters( 'walker_nav_menu_start_el', $item_output, $item, $depth, $args );
    }
}
</pre>

As you can see creating “nav walkers” is not that difficult.

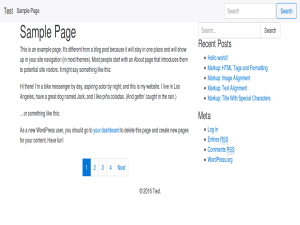
In stead of changing the HTML you can also try to change the compiled CSS code. You can take the page pagination as an example. Currently the JBST theme has got a custom function to display the page navigation which result in the HTML like that shown in the code beneath:

<nav style="text-align:center">
  <ul class="pagination">
    <li class="page-item"><a href="http://wordpress/index.php/page/2/" >Previous</a></li>
    <li class="page-item"><a class="page-link" href="http://wordpress/">1</a></li>
    <li class="page-item"><a class="page-link" href="http://wordpress/index.php/page/2/">2</a></li>
    <li class="page-item active"><span class="page-link"> 3 </span></li>
    <li class="page-item"><a class="page-link" href="http://wordpress/index.php/page/4/">4</a></li>
    <li class="page-item"><a href="http://wordpress/index.php/page/4/" >Next</a></li>
  </ul>                   
</nav>        					

The above HTML code for the page navigation contains Bootstrap CSS classes for presentation.

When using WordPress’ built-in function for page navigation as follows:

<?php
the_posts_pagination( array(
    'mid_size'  => 2,
    'prev_text' => __( 'Previous', 'textdomain' ),
    'next_text' => __( 'Next', 'textdomain' ),
) );
?>   

The function call above will generate HTML code like that shown beneath:

<nav class="navigation pagination" role="navigation">
  <h2 class="screen-reader-text">Posts navigation</h2>
  <div class="nav-links"><a class="prev page-numbers" href="http://wordpress/index.php/page/2/">Previous</a>
  <div class="nav-links">
    <a class="prev page-numbers" href="http://wordpress/index.php/page/2/">Back</a>
    <a class="page-numbers" href="http://wordpress/">1</a>
    <a class="page-numbers" href="http://wordpress/index.php/page/2/">2</a>
    <span class="page-numbers current">3</span>
    <a class="page-numbers" href="http://wordpress/index.php/page/4/">4</a>
    <a class="next page-numbers" href="http://wordpress/index.php/page/4/">Onward</a>
  </div>
</nav>  

Now you can code some CSS code which applies Bootstrap’s presentation for the page navigation on the CSS classes above. You SCSS should look like that shown beneath:

// pagination default
.navigation.pagination {
  @include center-block;
  text-align: center; 
  .nav-links {
    @extend .pagination;
    .page-numbers {
      @extend .page-link;
      &:first-child {
        margin-left: 0;
        @include border-left-radius($border-radius);
      }
      &:last-child {
        @include border-right-radius($border-radius);
      }
      &.current {
        @include plain-hover-focus {
          z-index: 2;
          color: $pagination-active-color;
          cursor: default;
          background-color: $pagination-active-bg;
          border-color: $pagination-active-border;
        }
      }
    }
  }
}

As you can see the above SCSS code looks complex and requires deep knowledge of Bootstrap’s SCSS code. Complexity of the SCSS code partially due to the SCSS code requires the .page-links wrapped into .page-item. Refactoring of the pagination component may reduce the complexity of the SCSS code in future, see also Refactor pagination in accordance with the Navs.

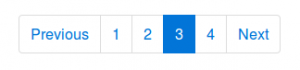
After compiling the SCSS code your page navigation will look like that shown in the figure below:

navigation

Both solutions; HTML or CSS change will give you the same result. When using the Sass @extend directive the compiled CSS code will become a little larger, due to having both the original and the extended selector. On the other hand there is no need to change WordPress by adding custom “walkers” and functions. At the moment i’m not sure which way to choose for the JBST 4 theme, i think most people will expect the HTML of the theme contains Bootstrap’s CSS classes.

Implementing Bootstrap with only SCSS / CSS on a bare theme like HTML5 Blank or _s, or underscores seems interesting too. Possible i will create some like “JBST 4 HTML5” theme in future.
Pure semantic HTML5 seems not possible with the Bootstrap Grid’s now, cause the .container wrapper is still required even when the optional flexbox support has been enabled. But you can compile Bootstrap without the predefined CSS grid classes and use the grid mixins to build your responsive layouts.

Also read What’s New in Bootstrap 4, and Happy coding!

Bootstrap 4 meets WordPress

Bootstrap 4 is coming soon! I build a WordPress theme for Bootstrap 4 (alpha release) inspired on the JOINTSWP starters theme. Bootstrap 4 comes with many improvements and new features. Bootstrap 4 is compiled with Sass instead of Less now.

You can download the JBST 4 theme at: https://github.com/bassjobsen/jbst-4-sass/archive/master.zip.

Now you can use Gulp and Sass to build your own custom version:

Install node.js.
Install bower.
Using the command line, navigate to your theme directory
Run npm install
Run gulp to confirm everything is working

Updating Bootstrap for your theme is simple as running bower update in your theme directory now.

Read more about Bootstrap 4 at The Official Bootstrap Blog or read the v4 alpha docs!

Don’t like Sass? Download a CSS only version of the JBST 4 theme at CSS only version

Bootstrap 4 ships with optional flexbox-based grid system and components, download a CSS only with flexbox support of the theme at CSS only version with flexbox support. To compile your own version of the theme with flexbox support you should edit the assets/scss/_variables.scss file and set $enable-flexbox: true;. Run gulp after your changes.Bootstrap 4, JBST 4 preview

WordPress: How to reverse the comment order with paged comments

In the settings panel of the WordPress Dashboard you will find the Discussion Settings. These settings enable you to create paged comments. You can set the top level comments per page, if you want to show the first or last page by default and if the oldest or newest comments should be shown on the to of each page.

In the situation that you want to show the newest comments first, you can set that the last page should showed be default with the newest comments on the top of each page. These setting are also shown in the following figure:

discussion settings expected

When using these settings i found some unexpected behavior. If you set the number of comments per page to 10 and for instance the total number of comments on your page is 44, you will get the following situation: The default page contains the 4 newest comments, and the next 4 pages contain 10 older comments each. In this situation i expected the newest 10 comments on the first page and the oldest 4 comments on the fifth and last page.

This strange behaviour will be due to the setting which shows the latest page first. If you inspect the comment queries in wp-includes/comments-template.php you will find that all comments are loaded with the oldest first (ORDER BY comment_date_gmt). Pages are created with an instance of the Walker_Comment class. This walker_Comment class create each page the same way. Order per page can be set with the reverse_top_level Boolean option (if not set the option when calling wp_list_comments() in your template the oldest/newest setting from the Discussion Settings will be used). The reverse_top_level option will only set the order per page and not the order for all comments.

Solution: reverse the comments array

The order issue with paged comments can be solved by using a filters which reverse the comments array returned by the database query in wp-includes/comments-template.php. After querying the database to get the list of comments the code applies the comments_array filter. You use this filter to reverse the comments array by adding the following code to your function.php file:

add_filter('comments_array',function($comments){return array_reverse($comments);});

When using the filter described above the Discussion Settings can be set to show the first page by default and the oldest comments first as be shown in the following figure:

discussion settings improved

Notice that the setting to show the oldest comments first seems to be strange if you want to show the newest comments first. When this setting is set to “oldest” the reverse_top_level Boolean option will be set to false, which means that the results per page are not reversed. That’s right because of the order of the comments is already set from new to old after reversing the comments array by the filter.

After applying the comments_array function you should also have to change the text or images used by the previous_comments_link() and next_comments_link() functions. The next link should refer to older comments instead of newer comments and so the previous links should refer to the older comments.

Further improvements

It seems interesting to take a look at the HTML link elements rel="next" and rel="prev" to indicate the relation between the pages with the comments. Some SEO plugins set these links, it’s unclear how reversing the comments influence that for now.
Finally you will find that the content of the page will be repeated on every comment page now. Paging your comment with jQuery which doesn’t reload the page can be an intresting strategy to investigate too. The jPages pagination for WordPress plugin integrates pagination for comments.

A11Y Buttons

The JBST WordPress Theme meets WordPress.org’s Accessibility Guidelines. I think accessibility support is important. Recently i got a e-mail from Nick, Co-founder of HKC radio.

Nick told me JBST default navbar buttons don’t have a label or title. The login button has a title when logged in, but when not logged in the button only identifies itself as ‘button’.

After reading Nick’s e-mail i found the excellent blog post of Nicholas C. Zakas: Making accessible icon buttons.

There seems two ways around to solve this button problem. The first solution adds aria-label attribute to the buttonHTML element. Whilst the second solution uses an additional spanelement which is hidden for non-screenreader by the JBST’s built-in sr-only class.

I create a sample for page for both solutions, this page also includes the current situation, could you tell me which solution you prefer and why? Or do we need a combination of these solutions?

Please also let me know when the button dropdowns got any accessibility issue.

Brand Your New WordPress Website in 10 Minutes

If you need a WordPress Website quick (or you are lazy) and you already have a house style or at least a logo, than this tutorial is all you need to brand your WordPress website. If you don’t have a logo yet, you can order one at Jamedo Logo or simply use a picture that you like.

Please follow the easy steps below to get your own branded, seo-friendly and responsive WordPress website. Your website will be built with JBST and Twitter’s Bootstrap and full customizable with Less.

  1. Download and install WordPress using the Famous 5-Minute Install
  2. Download, install (do not active) JBST. Please notice that the JBST theme is also available from the wordpress.org directory
  3. Download, install and activate JBST Branding
  4. In your Dashboard: Appearance > Branding
  5. Upload your logo / or picture
  6. Recompile the Less code

More information about downloading, installing and activating WordPress themes can be found at: Using Themes.

The following figure will show you how to upload your logo and recompile the Less code under Appearance > Branding in your Dashboard.

Brandingyourwebsite

The logo used in the preceding figure can be download at Pixabay and is available under the CC0 1.0 Universal (CC0 1.0) license.

Some other examples can be found in the following figures:

brandingexamplelogo1

The logo used in the preceding figure can be download at Free Logos.

Or create a website for the cattery of the girlfriend of your neighbours’ nephew. The only thing you need is a picture of her lovely cats.

cattery

The picture used in the preceding figure can be download at Pixabay and is available under the CC0 1.0 Universal (CC0 1.0) license.

Please try it yourself and share your example designs with me.

Send an invoice automatically with WooCommerce 2.x

The Question: “WooCommerce only sends invoice when triggered in the Dashboard. How to send these invoice automatically?”. Stackexchange.com WordPress Development does not allow WooCommerce questions any more. That is why i post the answer for this question here.

Add an action to your woocommerce_order_status_completed_notification or woocommerce_order_status_pending_to_processing_notification in functions.php:

function sendinvoice($orderid)
{
    $email = new WC_Email_Customer_Invoice();
    $email->trigger($orderid);
}   

add_action('woocommerce_order_status_completed_notification','sendinvoice');

WordPress theming, the comment_form() call, and the power of Less

When preparing the upload of the next version of JBST to wordpress.org I found the usage of comment_form(). The documentation of comment_form() can be found at Function Reference/comment form. The documentation of comment_form() doesn’t explain why you should have to use this comment_form() call instead of code your comment form’s HTML directly into your comments.php template. On the first sight using comment_form() and setting the comment form field’s HTML by PHP as an function argument or inside a filter, seems the break the MVC principle. Templates should not contain PHP code at all.
Arguments to motivate the usage of comment_form() can be found at WordPress 3.0 Theme Tip: The Comment Form. Standardization is an important argument:

The comment_form function is new to 3.0. Basically, it standardizes the comments form. It makes it wonderful for us plugin authors, since now we can easily modify the comments form with various hooks and things.

When using comment_form() the HTML of the form fields can be set in two different ways, as shown below:

In the first place you can use the comment_form_default_fields filter. The comment_form_default_fields filter return an associative array which contains the HTML for each field as can be seen in the following code:


add_filter( 'comment_form_default_fields', function(){ 

	$commenter = wp_get_current_commenter();
	$req = get_option( 'require_name_email' );

	return array(

    'author' =>
      '<div class="form-group">
			  <label for="author">' . __("Name",'jamedo-bootstrap-start-theme')
			 . ($req ? " (". __("required",'jamedo-bootstrap-start-theme') .")" : '')
			 . ' </label>
			  <div class="input-group">
			  	<span class="input-group-addon"><i class="glyphicon glyphicon-user"></i></span>
			  	<input class="form-control" type="text" name="author" id="author" value="'
			  	. esc_attr($commenter['comment_author']). '" placeholder="'
			  	. __("Your Name",'jamedo-bootstrap-start-theme'). '"'
			  	. ($req ? ' required aria-required="true"' : ''). '/>'
			  . '</div>'
		  	. '</div>',

    'email' =>
      '<div class="form-group">
			  <label for="email">' . __("Email",'jamedo-bootstrap-start-theme')
			 . ($req ? " (". __("required",'jamedo-bootstrap-start-theme') .")" : '')
			 . ' </label>
			  <div class="input-group">
			  	<span class="input-group-addon"><i class="glyphicon glyphicon-envelope"></i></span>
			  	<input class="form-control" type="email" name="email" id="email" value="'
			  	. esc_attr($commenter['comment_author_email']). '" placeholder="'
			  	. __("Your Email",'jamedo-bootstrap-start-theme'). '"'
			  	. ($req ? ' required aria-required="true"' : ''). '/>'
			  . '</div>'
			  . '<span class="help-block">'. __("will not be published",'jamedo-bootstrap-start-theme'). '</span>'
		  	. '</div>',

    'url' => '<div class="form-group">
			  <label for="author">' . __("Website",'jamedo-bootstrap-start-theme')
			 . ' </label>
			  <div class="input-group">
			  	<span class="input-group-addon"><i class="glyphicon glyphicon-user"></i></span>
			  	<input class="form-control" type="url" name="url" id="url" value="'
			  	. esc_attr($commenter['comment_author_url']). '" placeholder="'
			  	. __("Your Website",'jamedo-bootstrap-start-theme'). '"'
			  	. '/>'
			  . '</div>'
		  	. '</div>'
    );}
  );

Secondly, the comment form field’s HTML can set with the array which is passed as an argument to comment_form() as follows:


$args = array ('fields'=> array('author' => '<input id="author" type="text" name="author" />'));
comment_form($args);

Please notice that the value of fields overwrites the settings of the comment_form_default_fields filter. The preceding code don’t set an email or url field which means the comment form won’t have these field too.

When using comment_form() in your templates you don’t have to code the different situations where the user is logged in or not, where the comments are open or closed, and so on. On the other hand you still have to code the function’s argument or filters as shown in the preceding.

Popular themes such as “Twentythirteen” use the comment_form() code which enables (plugin) developers to change the look and feel of the comment form with filters or CSS. In this standard situation theme coders only have to write comment_form() in the comments.php template and style the form with CSS.

WooCommerce

The WooCommerce Plugin uses the comment_form() code to build a review form. The code to create the review form will like that shown as in the following code:


comment_form( apply_filters( 'woocommerce_product_review_comment_form_args', $comment_form ) );


The additional woocommerce_product_review_comment_form_args filter adds extra flexibility for theme and plugin developers. In the following figure you will see how WooCommerce default review form will look:

WooCommerce's review form

JBST’s comments form

For JBST the comments form should be build with Bootstrap’s form classes and structures as can be found at: . To change the default input fields I use comment_form_default_fields filter as shown earlier in this text. Other changes are set by the argument passed to the comment_form() function as shown in the following code:


	comment_form(

			apply_filters ('jbst_comments_form_arguments', array('comment_notes_before' => '',
			'comment_field' => $comment_field,
			'title_reply' => $title_reply))
	);


The comment_form() function has no filters to change the submit button. You can change the text and the ID of the submit button with the argument array, but are not enable to change the HTML of the button (input type="submit"). The submit button can be styled with CSS. To style the submit button in JBST Bootstrap’s button classes are used. This button classes can be applied easily with Less. JBST has a built-in Less compiler. To style the submit button with Bootstrap’s button classes I use the Less code as follows:


#commentform {
	input[type="submit"] {
	&:extend(.btn all, .btn-primary all);
	}
}	


The .btn-primary button style class is variable in JBST, so the final Less code in PHP will look like the following:


#commentform {
	input[type="submit"] {
	&:extend(.btn all, .'.get_theme_mod( 'default_button_style', 'btn-primary' ).' all);
	}
}	


The following figure will show you how JBST comments form will look after the changes described in the preceding:

JBST's comment form


Adding a background gradient to Bootstrap’s navbar with Less

When writing a book about Less and have to answer a question about adding a background gradient to JBST’s navbar the answer was found easy. Bootstrap’s navbar is styled with two CSS classes the .navbar class sets it’s structure while the .navbar-default or .navbar-inverse classes add colors and other styling. Bootstrap’s mixins contain also mixin for CSS3 background gradients. With the preceding knowledge adding a background-gradient will be as simple as writing in Less:

.navbar-default {
#gradient > .vertical(lighten(@navbar-default-bg,10%),darken(@navbar-default-bg,10%));
}

You should append this code to bootstrap.less and recompile Bootstrap. After recompiling the default navbar will be look like that shown below:

Twitter's Bootstrap default navbar with background gradient

Who don’t want to recompile Bootstrap can try to use the compiled CSS directly:

.navbar-default {
background-image: -webkit-linear-gradient(top, #ffffff 0%, #dfdfdf 100%);
background-image: linear-gradient(to bottom, #ffffff 0%, #dfdfdf 100%);
background-repeat: repeat-x;
filter: progid:DXImageTransform.Microsoft.gradient(startColorstr='#ffffffff', endColorstr='#ffdfdfdf', GradientType=0);
}

In the above you should find the values for #ffffff (white, lightest color) and  #dfdfdf (darkest color) yourself.

With Less changing the default background will be easy to:

.navbar-default {
#gradient > .vertical(lighten(@navbar-default-bg,10%),darken(@navbar-default-bg,10%));
}
@navbar-default-bg: purple;

The above will give you a purple gradient as background. Or the horizontal gradient variant:

.navbar-default {
#gradient > .horizontal(lighten(@navbar-default-bg,10%),darken(@navbar-default-bg,10%));
}
@navbar-default-bg: red;

All the above don’t restrict you to use the @navbar-default-bg only, you can choose your own colors or even use the three colored horizontal gradient:

.navbar-default {
#gradient > .horizontal-three-colors(red;white;50%;blue);
}

Which makes your navbar let’s look like shown below:

Twitter Bootstrap 3 navbar with three colors gradient

Buttons

You can also add a gradient to the Bootstrap’s default button with Less in the same way. The CSS classes of these buttons have the same structure as the navbar, the .btn class makes the button and a second class adds it’s styles. Except from the link button there are six default button styles in Bootstrap. To add a gradient to these button you can use the Less code shown below:

// add gradient to alternate buttons
// --------------------------------------------------

.btn-default {
#gradient > .vertical(lighten(@btn-default-bg,10%),darken(@btn-default-bg,10%));
}
.btn-primary {
#gradient > .vertical(lighten(@btn-primary-bg,10%),darken(@btn-primary-bg,10%));
}
// Success appears as green
.btn-success {
#gradient > .vertical(lighten(@btn-success-bg,10%),darken(@btn-success-bg,10%));
}
// Info appears as blue-green
.btn-info {
#gradient > .vertical(lighten(@btn-info-bg,10%),darken(@btn-info-bg,10%));
}
// Warning appears as orange
.btn-warning {
#gradient > .vertical(lighten(@btn-warning-bg,10%),darken(@btn-warning-bg,10%));
}
// Danger and error appear as red
.btn-danger {
#gradient > .vertical(lighten(@btn-danger-bg,10%),darken(@btn-danger-bg,10%));
}

After appending this to to bootstrap.less and recompiling Bootstrap your buttons will look like:

Twitter Bootstrap 3 buttons with background gradient

Also for button you are not restricted to Bootstrap’s default colors, try for instance:

.btn-custom {
.button-variant(black; white; white);
#gradient > .horizontal-three-colors(red;white;50%;blue);
}

Twitter Bootstrap custom button with three colors gradient


Also read:


WordPress and PageSpeed Insights

Today i tested my WordPress Theme on Google’s PageSpeed Insights. The result was a little disapointing. The Desktop version scored above 90 out of 100, but the mobile version scored around 80.

Based on Google’s suggestions i searched for some solutions.

Eliminate render-blocking JavaScript and CSS in above-the-fold content

Due to my own plugin Wp Defer loading there was no render-blocking JavaScript.

@import CSS child theme

My test site runs a child theme of JBST. The stylesheet of this child theme imports the stylesheet of it’s parent by @import url(../jamedo-bootstrap-start-theme/style.css);. Although appropriate course of action following Child Themes this is a performance issue.

In the case of JBST the parent style.css contains only some empty default styles. So for child themes (of JBST) remove this @import. Also notice for the parent style.css can’t be excluded by removing wp_enqueue_style( 'jbst-style', get_stylesheet_uri() ); cause some child themes will relay on it’s own style.css instead of only LESS code (custom.less).

Plugin’s stylesheets

My test site use a Question and Asnswer plugin, i found it’s style sheet included on my front page as well. On the front page this style sheet shouldn’t load.

Prevent Plugin’s from loading

By default WordPress loads all plugins (including CSS and JavaScript) on all pages. This also mean performance can be improved at two different stages: prevent the plugin from loading at all and prevent the style sheets and JavaScript from loading.

First a found the “Selective Loading Plugin”. This plugin looks promising, but seems not to work well or at least as expected. After add the class initialization which was missing, the settings interface won’t work too. I found some plugins not loading but overall the result was not good.

After this i investigate where plugins load in WordPress’s code. Plugins load in wp-settings.php, there are no hooks for this action defined. Also the old school (and deprecated!) my-hacks.php can not overwrite the loaded plugins.

The only way to prevent plugin from loading, i found, is edit wp-setting.php itself. Plugins are load by including through iterating an array with plugin paths:

// Load active plugins.
foreach ( wp_get_active_and_valid_plugins() as $plugin )
	include_once( $plugin );
unset( $plugin );

So removing paths from this array will prevent them from loading. For my test site i found the plugin path has q-and-a in its name and the plugin should only load if the request uri contains /knowledge-base/. Based on this data i could change the preceding code into:

// Load active plugins.
$plugins = wp_get_active_and_valid_plugins();
foreach($plugins as $key=>$value)
{
if(strstr($value,'q-and-a') &&  !strstr($_SERVER['REQUEST_URI'],'/knowledge-base/')){unset($plugins[$key]);}
}
foreach ( $plugins as $plugin )
        include_once( $plugin );
unset( $plugin );

The above works well. If you know what to code, you can code it effective. You also have to remember that wp-settings.php will be overwritten when upgrading WordPress.

I also found i can’t remove every plugin this way. For example removing WooCommerce cause problems with the shopping button which should be load on every page and requires WooCommerce (global $woocommerce). Maybe a reason to load all by default.

Prevent CSS and Javascript from loading

On How can I reduce the amount of files loaded/included per plugin? i found: “Current versions of WordPress allow for enqueuing later in the flow so you you can, for example, enqueue on your shortcode init/parse.” I will test this soon, cause it seems very useful for my own plugins too.

For now i start conditional dequeue CSS an Javascript i don’t need. For example for WooCommerce this can been done effective by adding some lines to functions.php:

if(function_exists('is_shop') && !is_shop())wp_dequeue_style( 'woocommerce_frontend_styles');

Overall i found some small code changes will have a huge performance profit.

Images

Pagespeed also mentioned: “Losslessly compressing” for some PNG files used. I found OptiPNG can resolve this easy.