Be prepared for Bootstrap v4

The upgrade from Twitter’s Bootstrap 2 to Bootstrap 3 was not painless. The current 3.2.0. release will give you some insights for the coming v4 release of Bootstrap. The 3.2.0. already adds some new things such as the responsive utility classes now have variants for diferents CSS display property values. The most important change till now, seems to be the adding of vendor prefixes to the CSS code automatically.

Responsive utility classes

In stead of the .visible-* classes (deprecated as of v3.2.0) you are now enable to use or .visible-*-block, .visible-*-inline or .visible-*-inline-block. The hidden-* classes don’t change because of they set the display to none always. The .visible-*-inline classes can be used to hide and display inline elements such as the <span> element. Consider the following example code to see the difference:

<p>This is a paragraph. <span class="visible-xs">(Small grid)</span>.</p>
<p>This is a paragraph. <span class="visible-xs-inline">(Small grid)</span>.</p>

As you can see in the image shown beneath, the layout of the paragraph has been broken in the first situation:

Wrong layout of the paragraph due to display:block

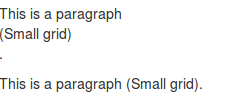
The .visible-xs class changed the display of the span element to block. Block level elements start on a new line and take all available space.

Better responsive display for embedded media

Bootstrap adds new classes for embedding media with <iframe>, <embed> and <object> elements. These classes keep the aspect ratio of your media intact when scaling down for different screen widths. With Bootstrap 3.2 you can use the following code:

<!-- 16:9 aspect ratio -->
<div class="embed-responsive embed-responsive-16by9">
<iframe class="embed-responsive-item" src="…"></iframe>
</div>

Try it a find your videos will look great again. Use the .embed-responsive-4by3 class for the 4:3 ratio.

Using autoprefixer as part of build system

The autoprefixer adds vendor prefixes to your CSS code automatically. Using the autoprefixer allows you to only use W3C property declarations in the Less code. More clean and consistent Less code will be the big win here. Note that as also described in my Less Web Development Essentials book:

Vendor-specific rules also provide us with early implementations of standard properties, and alternative syntax.

If you take a look into the <code>/less</code> directory you will find that the mixins are modularized into separate files inside the <code>/less/mixins</code> directory. Before v3.2.0 vendor prefixes where set by mixins. These mixins for vendor prefixes are moved to the less/mixins/vendor-prefixes.less for backward compatibility reasons now. These vendor prefixes are deprecated as of v3.2.0 and will be dropped in v4.

Who used Grunt to build the Bootstrap CSS already will full profit from these change. People who compile the Bootstrap Less code with an other Less compiler for their projects will find some troubles since version v3.2.0. Till v4 new and improved code will not any longer prefixed by Less. Impossibilities in your build process to auto prefix your code automatically will cause non-prefixed CSS in your code base.

To get insight in the consequences of these change you can compare the CSS code build with the Bootstrap build process and the CSS code when compiling with Less directly. Run the following commands in your Bootstrap directory:


>> grunt dist
>> lessc less/bootstrap.less nonprefixed.css
>> diff -b nonprefixed.css dist/css/bootstrap.css

After running the preceding command you will find for instance the following code:

1345c1359,1360
< box-shadow: inset 0 -1px 0 rgba(0, 0, 0, 0.25);
---
> -webkit-box-shadow: inset 0 -1px 0 rgba(0, 0, 0, .25);
> box-shadow: inset 0 -1px 0 rgba(0, 0, 0, .25);

When inspecting the compiled CSS will show you that the box-shadow property for the kbd selector is not prefixed if not using the autoprefixer. The preceding will be due to the Less code for the kbd selector in the less/code.less file does not call the .box-shadow() mixin. Before v3.2.0 not calling the prefixed mixins could be considered as an bug, since v3.2.0 these issues are solved by the autoprefixer automatically. Cause the non mixin calling code will be the prefered code for version 3.2+ and the coming version 4 of Bootstrap this code should not changed any more. Consequently the browser support of the CSS code which has been compiled by Less directly and did not run through the autoprefixer will decrease compared to Bootstrap original CSS code.

The best solution for this issue is to change your build process to enable the autoprefixer as recommended by Bootstrap. Unfortunately some situations can’t be solved this way. Grunt and so the autoprefixer requires Node.js which is not available in some situations. You can read more about this issue in my next post about the JBST WordPress starters theme, which has a built-in Less compiler based on PHP.

Bootstrap 3.2.0 and Shrinkwrap

When running npm install with the latest 3.2.0. release of Bootstrap I found the following error:

Loading "Gruntfile.js" tasks...ERROR
>> AssertionError: args.type is required
Warning: Task "dist" not found. Use --force to continue.

This issue can be solved by running the grunt update-shrinkwrap task just after npm install.

With version 3.2.0. Booststrap switch to the npm version of shrinkwrap. Shrinkwrap locks down the versions of a package’s dependencies so that you can control exactly which versions of each dependency will be used when your package is installed.
The Shrinkwrap task should be run whenever Bootstrap’s dependencies change and so you will have to run it after npm install.

WordPress: How to reverse the comment order with paged comments

In the settings panel of the WordPress Dashboard you will find the Discussion Settings. These settings enable you to create paged comments. You can set the top level comments per page, if you want to show the first or last page by default and if the oldest or newest comments should be shown on the to of each page.

In the situation that you want to show the newest comments first, you can set that the last page should showed be default with the newest comments on the top of each page. These setting are also shown in the following figure:

discussion settings expected

When using these settings i found some unexpected behavior. If you set the number of comments per page to 10 and for instance the total number of comments on your page is 44, you will get the following situation: The default page contains the 4 newest comments, and the next 4 pages contain 10 older comments each. In this situation i expected the newest 10 comments on the first page and the oldest 4 comments on the fifth and last page.

This strange behaviour will be due to the setting which shows the latest page first. If you inspect the comment queries in wp-includes/comments-template.php you will find that all comments are loaded with the oldest first (ORDER BY comment_date_gmt). Pages are created with an instance of the Walker_Comment class. This walker_Comment class create each page the same way. Order per page can be set with the reverse_top_level Boolean option (if not set the option when calling wp_list_comments() in your template the oldest/newest setting from the Discussion Settings will be used). The reverse_top_level option will only set the order per page and not the order for all comments.

Solution: reverse the comments array

The order issue with paged comments can be solved by using a filters which reverse the comments array returned by the database query in wp-includes/comments-template.php. After querying the database to get the list of comments the code applies the comments_array filter. You use this filter to reverse the comments array by adding the following code to your function.php file:

add_filter('comments_array',function($comments){return array_reverse($comments);});

When using the filter described above the Discussion Settings can be set to show the first page by default and the oldest comments first as be shown in the following figure:

discussion settings improved

Notice that the setting to show the oldest comments first seems to be strange if you want to show the newest comments first. When this setting is set to “oldest” the reverse_top_level Boolean option will be set to false, which means that the results per page are not reversed. That’s right because of the order of the comments is already set from new to old after reversing the comments array by the filter.

After applying the comments_array function you should also have to change the text or images used by the previous_comments_link() and next_comments_link() functions. The next link should refer to older comments instead of newer comments and so the previous links should refer to the older comments.

Further improvements

It seems interesting to take a look at the HTML link elements rel="next" and rel="prev" to indicate the relation between the pages with the comments. Some SEO plugins set these links, it’s unclear how reversing the comments influence that for now.
Finally you will find that the content of the page will be repeated on every comment page now. Paging your comment with jQuery which doesn’t reload the page can be an intresting strategy to investigate too. The jPages pagination for WordPress plugin integrates pagination for comments.

A11Y Buttons

The JBST WordPress Theme meets WordPress.org’s Accessibility Guidelines. I think accessibility support is important. Recently i got a e-mail from Nick, Co-founder of HKC radio.

Nick told me JBST default navbar buttons don’t have a label or title. The login button has a title when logged in, but when not logged in the button only identifies itself as ‘button’.

After reading Nick’s e-mail i found the excellent blog post of Nicholas C. Zakas: Making accessible icon buttons.

There seems two ways around to solve this button problem. The first solution adds aria-label attribute to the buttonHTML element. Whilst the second solution uses an additional spanelement which is hidden for non-screenreader by the JBST’s built-in sr-only class.

I create a sample for page for both solutions, this page also includes the current situation, could you tell me which solution you prefer and why? Or do we need a combination of these solutions?

Please also let me know when the button dropdowns got any accessibility issue.

Brand Your New WordPress Website in 10 Minutes

If you need a WordPress Website quick (or you are lazy) and you already have a house style or at least a logo, than this tutorial is all you need to brand your WordPress website. If you don’t have a logo yet, you can order one at Jamedo Logo or simply use a picture that you like.

Please follow the easy steps below to get your own branded, seo-friendly and responsive WordPress website. Your website will be built with JBST and Twitter’s Bootstrap and full customizable with Less.

  1. Download and install WordPress using the Famous 5-Minute Install
  2. Download, install (do not active) JBST. Please notice that the JBST theme is also available from the wordpress.org directory
  3. Download, install and activate JBST Branding
  4. In your Dashboard: Appearance > Branding
  5. Upload your logo / or picture
  6. Recompile the Less code

More information about downloading, installing and activating WordPress themes can be found at: Using Themes.

The following figure will show you how to upload your logo and recompile the Less code under Appearance > Branding in your Dashboard.

Brandingyourwebsite

The logo used in the preceding figure can be download at Pixabay and is available under the CC0 1.0 Universal (CC0 1.0) license.

Some other examples can be found in the following figures:

brandingexamplelogo1

The logo used in the preceding figure can be download at Free Logos.

Or create a website for the cattery of the girlfriend of your neighbours’ nephew. The only thing you need is a picture of her lovely cats.

cattery

The picture used in the preceding figure can be download at Pixabay and is available under the CC0 1.0 Universal (CC0 1.0) license.

Please try it yourself and share your example designs with me.

Send an invoice automatically with WooCommerce 2.x

The Question: “WooCommerce only sends invoice when triggered in the Dashboard. How to send these invoice automatically?”. Stackexchange.com WordPress Development does not allow WooCommerce questions any more. That is why i post the answer for this question here.

Add an action to your woocommerce_order_status_completed_notification or woocommerce_order_status_pending_to_processing_notification in functions.php:

function sendinvoice($orderid)
{
    $email = new WC_Email_Customer_Invoice();
    $email->trigger($orderid);
}   

add_action('woocommerce_order_status_completed_notification','sendinvoice');

WordPress theming, the comment_form() call, and the power of Less

When preparing the upload of the next version of JBST to wordpress.org I found the usage of comment_form(). The documentation of comment_form() can be found at Function Reference/comment form. The documentation of comment_form() doesn’t explain why you should have to use this comment_form() call instead of code your comment form’s HTML directly into your comments.php template. On the first sight using comment_form() and setting the comment form field’s HTML by PHP as an function argument or inside a filter, seems the break the MVC principle. Templates should not contain PHP code at all.
Arguments to motivate the usage of comment_form() can be found at WordPress 3.0 Theme Tip: The Comment Form. Standardization is an important argument:

The comment_form function is new to 3.0. Basically, it standardizes the comments form. It makes it wonderful for us plugin authors, since now we can easily modify the comments form with various hooks and things.

When using comment_form() the HTML of the form fields can be set in two different ways, as shown below:

In the first place you can use the comment_form_default_fields filter. The comment_form_default_fields filter return an associative array which contains the HTML for each field as can be seen in the following code:


add_filter( 'comment_form_default_fields', function(){ 

	$commenter = wp_get_current_commenter();
	$req = get_option( 'require_name_email' );

	return array(

    'author' =>
      '<div class="form-group">
			  <label for="author">' . __("Name",'jamedo-bootstrap-start-theme')
			 . ($req ? " (". __("required",'jamedo-bootstrap-start-theme') .")" : '')
			 . ' </label>
			  <div class="input-group">
			  	<span class="input-group-addon"><i class="glyphicon glyphicon-user"></i></span>
			  	<input class="form-control" type="text" name="author" id="author" value="'
			  	. esc_attr($commenter['comment_author']). '" placeholder="'
			  	. __("Your Name",'jamedo-bootstrap-start-theme'). '"'
			  	. ($req ? ' required aria-required="true"' : ''). '/>'
			  . '</div>'
		  	. '</div>',

    'email' =>
      '<div class="form-group">
			  <label for="email">' . __("Email",'jamedo-bootstrap-start-theme')
			 . ($req ? " (". __("required",'jamedo-bootstrap-start-theme') .")" : '')
			 . ' </label>
			  <div class="input-group">
			  	<span class="input-group-addon"><i class="glyphicon glyphicon-envelope"></i></span>
			  	<input class="form-control" type="email" name="email" id="email" value="'
			  	. esc_attr($commenter['comment_author_email']). '" placeholder="'
			  	. __("Your Email",'jamedo-bootstrap-start-theme'). '"'
			  	. ($req ? ' required aria-required="true"' : ''). '/>'
			  . '</div>'
			  . '<span class="help-block">'. __("will not be published",'jamedo-bootstrap-start-theme'). '</span>'
		  	. '</div>',

    'url' => '<div class="form-group">
			  <label for="author">' . __("Website",'jamedo-bootstrap-start-theme')
			 . ' </label>
			  <div class="input-group">
			  	<span class="input-group-addon"><i class="glyphicon glyphicon-user"></i></span>
			  	<input class="form-control" type="url" name="url" id="url" value="'
			  	. esc_attr($commenter['comment_author_url']). '" placeholder="'
			  	. __("Your Website",'jamedo-bootstrap-start-theme'). '"'
			  	. '/>'
			  . '</div>'
		  	. '</div>'
    );}
  );

Secondly, the comment form field’s HTML can set with the array which is passed as an argument to comment_form() as follows:


$args = array ('fields'=> array('author' => '<input id="author" type="text" name="author" />'));
comment_form($args);

Please notice that the value of fields overwrites the settings of the comment_form_default_fields filter. The preceding code don’t set an email or url field which means the comment form won’t have these field too.

When using comment_form() in your templates you don’t have to code the different situations where the user is logged in or not, where the comments are open or closed, and so on. On the other hand you still have to code the function’s argument or filters as shown in the preceding.

Popular themes such as “Twentythirteen” use the comment_form() code which enables (plugin) developers to change the look and feel of the comment form with filters or CSS. In this standard situation theme coders only have to write comment_form() in the comments.php template and style the form with CSS.

WooCommerce

The WooCommerce Plugin uses the comment_form() code to build a review form. The code to create the review form will like that shown as in the following code:


comment_form( apply_filters( 'woocommerce_product_review_comment_form_args', $comment_form ) );


The additional woocommerce_product_review_comment_form_args filter adds extra flexibility for theme and plugin developers. In the following figure you will see how WooCommerce default review form will look:

WooCommerce's review form

JBST’s comments form

For JBST the comments form should be build with Bootstrap’s form classes and structures as can be found at: . To change the default input fields I use comment_form_default_fields filter as shown earlier in this text. Other changes are set by the argument passed to the comment_form() function as shown in the following code:


	comment_form(

			apply_filters ('jbst_comments_form_arguments', array('comment_notes_before' => '',
			'comment_field' => $comment_field,
			'title_reply' => $title_reply))
	);


The comment_form() function has no filters to change the submit button. You can change the text and the ID of the submit button with the argument array, but are not enable to change the HTML of the button (input type="submit"). The submit button can be styled with CSS. To style the submit button in JBST Bootstrap’s button classes are used. This button classes can be applied easily with Less. JBST has a built-in Less compiler. To style the submit button with Bootstrap’s button classes I use the Less code as follows:


#commentform {
	input[type="submit"] {
	&:extend(.btn all, .btn-primary all);
	}
}	


The .btn-primary button style class is variable in JBST, so the final Less code in PHP will look like the following:


#commentform {
	input[type="submit"] {
	&:extend(.btn all, .'.get_theme_mod( 'default_button_style', 'btn-primary' ).' all);
	}
}	


The following figure will show you how JBST comments form will look after the changes described in the preceding:

JBST's comment form


Adding a background gradient to Bootstrap’s navbar with Less

When writing a book about Less and have to answer a question about adding a background gradient to JBST’s navbar the answer was found easy. Bootstrap’s navbar is styled with two CSS classes the .navbar class sets it’s structure while the .navbar-default or .navbar-inverse classes add colors and other styling. Bootstrap’s mixins contain also mixin for CSS3 background gradients. With the preceding knowledge adding a background-gradient will be as simple as writing in Less:

.navbar-default {
#gradient > .vertical(lighten(@navbar-default-bg,10%),darken(@navbar-default-bg,10%));
}

You should append this code to bootstrap.less and recompile Bootstrap. After recompiling the default navbar will be look like that shown below:

Twitter's Bootstrap default navbar with background gradient

Who don’t want to recompile Bootstrap can try to use the compiled CSS directly:

.navbar-default {
background-image: -webkit-linear-gradient(top, #ffffff 0%, #dfdfdf 100%);
background-image: linear-gradient(to bottom, #ffffff 0%, #dfdfdf 100%);
background-repeat: repeat-x;
filter: progid:DXImageTransform.Microsoft.gradient(startColorstr='#ffffffff', endColorstr='#ffdfdfdf', GradientType=0);
}

In the above you should find the values for #ffffff (white, lightest color) and  #dfdfdf (darkest color) yourself.

With Less changing the default background will be easy to:

.navbar-default {
#gradient > .vertical(lighten(@navbar-default-bg,10%),darken(@navbar-default-bg,10%));
}
@navbar-default-bg: purple;

The above will give you a purple gradient as background. Or the horizontal gradient variant:

.navbar-default {
#gradient > .horizontal(lighten(@navbar-default-bg,10%),darken(@navbar-default-bg,10%));
}
@navbar-default-bg: red;

All the above don’t restrict you to use the @navbar-default-bg only, you can choose your own colors or even use the three colored horizontal gradient:

.navbar-default {
#gradient > .horizontal-three-colors(red;white;50%;blue);
}

Which makes your navbar let’s look like shown below:

Twitter Bootstrap 3 navbar with three colors gradient

Buttons

You can also add a gradient to the Bootstrap’s default button with Less in the same way. The CSS classes of these buttons have the same structure as the navbar, the .btn class makes the button and a second class adds it’s styles. Except from the link button there are six default button styles in Bootstrap. To add a gradient to these button you can use the Less code shown below:

// add gradient to alternate buttons
// --------------------------------------------------

.btn-default {
#gradient > .vertical(lighten(@btn-default-bg,10%),darken(@btn-default-bg,10%));
}
.btn-primary {
#gradient > .vertical(lighten(@btn-primary-bg,10%),darken(@btn-primary-bg,10%));
}
// Success appears as green
.btn-success {
#gradient > .vertical(lighten(@btn-success-bg,10%),darken(@btn-success-bg,10%));
}
// Info appears as blue-green
.btn-info {
#gradient > .vertical(lighten(@btn-info-bg,10%),darken(@btn-info-bg,10%));
}
// Warning appears as orange
.btn-warning {
#gradient > .vertical(lighten(@btn-warning-bg,10%),darken(@btn-warning-bg,10%));
}
// Danger and error appear as red
.btn-danger {
#gradient > .vertical(lighten(@btn-danger-bg,10%),darken(@btn-danger-bg,10%));
}

After appending this to to bootstrap.less and recompiling Bootstrap your buttons will look like:

Twitter Bootstrap 3 buttons with background gradient

Also for button you are not restricted to Bootstrap’s default colors, try for instance:

.btn-custom {
.button-variant(black; white; white);
#gradient > .horizontal-three-colors(red;white;50%;blue);
}

Twitter Bootstrap custom button with three colors gradient


Also read:


WordPress and PageSpeed Insights

Today i tested my WordPress Theme on Google’s PageSpeed Insights. The result was a little disapointing. The Desktop version scored above 90 out of 100, but the mobile version scored around 80.

Based on Google’s suggestions i searched for some solutions.

Eliminate render-blocking JavaScript and CSS in above-the-fold content

Due to my own plugin Wp Defer loading there was no render-blocking JavaScript.

@import CSS child theme

My test site runs a child theme of JBST. The stylesheet of this child theme imports the stylesheet of it’s parent by @import url(../jamedo-bootstrap-start-theme/style.css);. Although appropriate course of action following Child Themes this is a performance issue.

In the case of JBST the parent style.css contains only some empty default styles. So for child themes (of JBST) remove this @import. Also notice for the parent style.css can’t be excluded by removing wp_enqueue_style( 'jbst-style', get_stylesheet_uri() ); cause some child themes will relay on it’s own style.css instead of only LESS code (custom.less).

Plugin’s stylesheets

My test site use a Question and Asnswer plugin, i found it’s style sheet included on my front page as well. On the front page this style sheet shouldn’t load.

Prevent Plugin’s from loading

By default WordPress loads all plugins (including CSS and JavaScript) on all pages. This also mean performance can be improved at two different stages: prevent the plugin from loading at all and prevent the style sheets and JavaScript from loading.

First a found the “Selective Loading Plugin”. This plugin looks promising, but seems not to work well or at least as expected. After add the class initialization which was missing, the settings interface won’t work too. I found some plugins not loading but overall the result was not good.

After this i investigate where plugins load in WordPress’s code. Plugins load in wp-settings.php, there are no hooks for this action defined. Also the old school (and deprecated!) my-hacks.php can not overwrite the loaded plugins.

The only way to prevent plugin from loading, i found, is edit wp-setting.php itself. Plugins are load by including through iterating an array with plugin paths:

// Load active plugins.
foreach ( wp_get_active_and_valid_plugins() as $plugin )
	include_once( $plugin );
unset( $plugin );

So removing paths from this array will prevent them from loading. For my test site i found the plugin path has q-and-a in its name and the plugin should only load if the request uri contains /knowledge-base/. Based on this data i could change the preceding code into:

// Load active plugins.
$plugins = wp_get_active_and_valid_plugins();
foreach($plugins as $key=>$value)
{
if(strstr($value,'q-and-a') &&  !strstr($_SERVER['REQUEST_URI'],'/knowledge-base/')){unset($plugins[$key]);}
}
foreach ( $plugins as $plugin )
        include_once( $plugin );
unset( $plugin );

The above works well. If you know what to code, you can code it effective. You also have to remember that wp-settings.php will be overwritten when upgrading WordPress.

I also found i can’t remove every plugin this way. For example removing WooCommerce cause problems with the shopping button which should be load on every page and requires WooCommerce (global $woocommerce). Maybe a reason to load all by default.

Prevent CSS and Javascript from loading

On How can I reduce the amount of files loaded/included per plugin? i found: “Current versions of WordPress allow for enqueuing later in the flow so you you can, for example, enqueue on your shortcode init/parse.” I will test this soon, cause it seems very useful for my own plugins too.

For now i start conditional dequeue CSS an Javascript i don’t need. For example for WooCommerce this can been done effective by adding some lines to functions.php:

if(function_exists('is_shop') && !is_shop())wp_dequeue_style( 'woocommerce_frontend_styles');

Overall i found some small code changes will have a huge performance profit.

Images

Pagespeed also mentioned: “Losslessly compressing” for some PNG files used. I found OptiPNG can resolve this easy.

Integrate LESS in JBST WordPress Theme

The WP LESS plugin offers a good opportunity to integrate LESS in your WordPress theme. How does this fit JBST? First i try to set the requirements.

JBST is based on Twitter’s Bootstrap, so we will have the option to update Twitter’s Bootstrap without changing any custom setting or extensions. JBST WordPress Theme can be use in two ways. In the first place someone can use JBST direct. In this case the website will be styled by using the build in customizer.
In the second option a child theme will be create. Customizing and styling will be done with the use of filters and hooks.
Updating of Twitter’s Bootstrap should be possible in both cases.
To find a suitable strategy i read Twitter Bootstrap Customization Best Practices. The solution of @sam seems to fit on the first sight. From How can I customize Twitter Bootstrap’s CSS using LESSCSS variables? i could construct a file structure.

Basically theme should compile customization.less which include Bootstrap. By default it always includes the bundled Bootstrap version. Compromise here will be the hard code path to Bootstrap’s LESS files:

@import ../../jamedobootstrapstarttheme/less/bootstrap.less
//custom Less code here

After this other CSS of JBST should also have to migrate to LESS. I will define a master and an custom file for this task too. So the final directory structure will look like:

/assets/bootstrap/less/*
/assets/jbst/less/*
/assets/less/boostrapcustomization.less
/assets/less/jbstcustomization.less

The plugin mentioned above should enqueue boostrapcustomization.less and jbstcustomization.less from the child theme folder if exists in the case of child theming or from the JBST parent theme in all other cases. Core files will always be imported from the parent theme. Updating Bootstrap won’t effect customizations.

So far the theoretical part. What did we find in practical? The first issue we found. The plugin didn’t support Twitter’s Bootstrap > 3.0.0. I fixed this by create a fork of the plugin which replies on less.php instead of LESSPHP. If your are interested you can download this code here.

Second issue was JBST doesn’t use the original Bootstrap files. Different versions of navbar.less are compiled and include based of the grid and navbar breakpoint (grid-float-breakpoint) settings in the customizer. To fix this we should save the customizer setting direct in some .less file (overriding bootstrap/variables.less).

Third JBST provides a custom CSS editor, this editor should be replace by a LESS editor.

The information in this blog will be used to migrate JBST to LESS. First steps are made already.