Bootstrap 4’s responsive navbars

Bootstrap 4 is in development. The alpha 3 stage had been reached yet. The new navbar is a simple wrapper for positioning branding, navigation, and other elements into a concise navigation header.

Many people has started testing Bootstrap 4 already. Before you start you should know that i did NOT switch from Less to Sass, but Bootstrap did. The CSS code of Bootstrap 4 is built with Sass now. Those who are no familiar with Sass yet should definitely read my new Sass and Compass Designer’s Cookbook book.

You can use Bootstrap CLI to test Bootstrap 4. Many templates are available yet. Bootstrap CLI is suitable for fast prototyping too!

At the time of writing this blog the code for the responsive navbar is not finished yet. I will provide you some quick fixes which enable you to use the responsive navbar in your new Bootstrap 4 projects. Notice that you should not use any alpha code for production.

The HTML code for a responsive navbar may look like that shown beneath:

<nav class="navbar navbar-dark navbar-full" role="navigation">
<div class="container">
<a class="navbar-brand" href="index.html">Navbar</a>
<button class="navbar-toggler hidden-md-up pull-xs-right" type="button" data-toggle="collapse" data-target="#collapsiblecontent">
&#9776;
</button>
<ul class="nav navbar-nav navbar-toggleable-sm collapse" id="collapsiblecontent">
<li class="nav-item">
<a class="nav-link active" href="#">Home <span class="sr-only">(current)</span></a>
</li>
<li class="nav-item">
<a class="nav-link" href="#">Features</a>
</li>
<li class="nav-item">
<a class="nav-link" href="#">Pricing</a>
</li>
<li class="nav-item">
<a class="nav-link" href="#">About</a>
</li>
</ul>
</div>
</nav>

Notice the hidden-md-up and navbar-toggleable-sm classes. The hidden-md-up class ensure that the “hamburger” menu to toggle the collapsing of the menu is only visible on the small viewports (the xs and sm grids). The navbar-toggleable-sm class collapses the menu and make it toggleable on the the xs and sm grids. The responsive navbar requires Bootstrap’s JavaScript Collapse plugin. When your navbar contains dropdowns, as explained later on, the Dropdown Plugin is required too.

Till the alpha-3 release of Bootstrap 4 the menu items do not stack for the collapsed menu. You can fix this by using the following SCSS code and recompile Bootstrap:

.navbar {
@include media-breakpoint-down(sm) {
.navbar-brand,
.nav-item {
float: none;
}
}
}

Now your menu items stack, but all nav items except from the first one got a margin-left. Fix the margin by editing the following SCSS code:

.navbar {
@include media-breakpoint-down(sm) {
.nav-item + .nav-item {
margin-left: 0;
}
}
}

Both solutions provide above use the media-breakpoint-down() mixin. Setting the @media with a max-width afterward will break the mobile first nature of Bootstrap 4, but for now these quick fixes will help you to test and protype with Bootstrap before the final version is released.

Dropdown menus in the navbar of Bootstrap 4

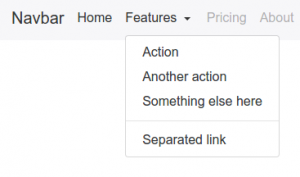
Bootstrap’s Dropdown Plugin enable you to create dropdown menus with ease. You can also add these dropdown menus in your navbar as follows:

<ul class="nav navbar-nav navbar-toggleable-sm collapse" id="collapsiblecontent">
<li class="nav-item">
<a class="nav-link active" href="#">Home <span class="sr-only">(current)</span></a>
</li>
<li class="nav-item dropdown">
<a class="nav-link dropdown-toggle" data-toggle="dropdown" href="#" role="button" aria-haspopup="true" aria-expanded="false">
Features
</a>
<div class="dropdown-menu">
<a class="dropdown-item" href="#">Action</a>
<a class="dropdown-item" href="#">Another action</a>
<a class="dropdown-item" href="#">Something else here</a>
<div class="dropdown-divider"></div>
<a class="dropdown-item" href="#">Separated link</a>
</div>
</li>
</ul>

When expecting the results in your browser you’ll find that the second menu item got a awesome dropdown menu:

Dropdown menu on the large grid

For screens smaller than the responsive breakpoint (768px) the dropdown menu should act like a normal nested ul element. Again Sass will save us. You can use the the following SCSS code to turn the dropdown menu into a nested collapsing element of list of nav items:

@include media-breakpoint-down(sm) {
.navbar {

.nav-item + .nav-item {
margin-left: 0;
}

.dropdown {
position: initial;
}

.dropdown-menu {
position: initial;
z-index: initial;
float: initial;
border: initial;
border-radius: initial;
}
}
}

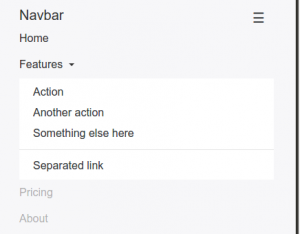
On the small viewports the dropdown menu will now look like that shown in the figure below:

Dropdown menu in the small grid

You can use Bootstrap CLI to test the responsive Bootstrap 4 navbar with dropdown menus:

[sudo] npm install -g gulp bower
npm install bootstrap-cli --global

And use the following command to set up the responsive Bootstrap 4 navbar with dropdown menus example:

bootstrap new --template responsive-navbar-dropdowns

Justified navbar items

Bootstrap 4 removes the option to justify your navbar items. You can justify your navbar items in Bootstrap 4 by using the nav-justified mixin:

// Justified nav links
// -------------------------

@mixin nav-justified($breakpoint: md) {
width: 100%;

.nav-item {
float: none;
}

.nav-link {
text-align: center;
margin-bottom: 5px;
}

> .dropdown .dropdown-menu { //todo: remove child selector
top: auto;
left: auto;
}

@include media-breakpoint-up($breakpoint) {
.nav-item {
display: table-cell;
width: 1%;
}
.nav-link {
margin-bottom: 0;
}
}
}

Use the following SCSS code to use the nav-justified mixin above:

.navbar {
@include nav-justified;
}

Recompile Bootstrap and you’ll find that your navbar will look like that shown in the figure below:

Bootstrap 4 Justified navbar items


You can test the Justified navbar items for Bootstrap 4 with Bootstrap CLI again:

bootstrap new --template nav-justified

Centered navbar items

To center a ul element inside a div element you’ll have to set text-align: center (you can use the predefined text-xs-center class of Bootstrap for that) and display: inline-block; for your centered list.

Your HTML code:

<nav class="navbar navbar-light main-nav">
<div class="container text-xs-center">
<ul class="nav navbar-nav pull-xs-left">
<li class="nav-item active">
<a class="nav-link" href="#">Home</a>
</li>
<li class="nav-item">
<a class="nav-link" href="#">Download</a>
</li>
<li class="nav-item">
<a class="nav-link" href="#">Register</a>
</li>
</ul>

<ul class="nav navbar-nav" style="display: inline-block;">
<li class="nav-item"><a class="nav-link" href="#">Website Name</a></li>
</ul>

<ul class="nav navbar-nav pull-xs-right">
<li class="nav-item">
<a class="nav-link" href="#">Rates</a>
</li>
<li class="nav-item">
<a class="nav-link" href="#">Help</a>
</li>
<li class="nav-item">
<a class="nav-link" href="#">Contact</a>
</li>
</ul>
</div>
</nav>

The results:

Bootstrap 4 Centered Navbar Item

Preserve settings and customizations when updating Bootstrap

Recently i launched the Bootstrap CLI tool. This tool installs Bootstrap 4 and an example template to start your project.

The templates for the Bootstrap CLI tool install Bootstrap 4 with bower, which means that you can update Bootstrap by simply running bower update. Updating Bootstrap shouldn’t destroy your changes.

All of Bootstrap’s Sass variable are declared with the !default flag, in the _variables.scss partial file. Using a copy of this file will be help to preserve your changes. Disadvantage of the preceding solution is that new variables added in the new release become undeclared and should be added by hand.

You can prevent the undeclared variables by loading the original and updated _variables.scss from your bower directory after your local one. You should rename your local file.

In your app.scss the preceding should look like that shown beneath:

@import "util/variables"; // non bootstrap project variables
@import "bootstrap-variables"; //local copy
@import "bootstrap.scss"; //local copy
// import or write your custom code here

When new variables are added in the new release they will be set to their defualt value and new default values will overwritten by the local copy. In the case you want to change a new variable, you still have to add it by hand in your local copy. Also new modules and components should be added by hand in the local bootstrap.scss file.

The local _bootstrap-variables.scss and _bootstrap.scss are not automatically generated when creating a new project because of updates of Bootstrap may break the template code.

Bootstrap 4 and WordPress

As already mentioned in my previous post about Bootstrap 4; i have built a WordPress Starter Theme with Bootstrap 4. If you like both Bootstrap and WordPress you should really try it!

People claim that Bootstrap and WordPress don’t always match, some opinions about that can be found at When to Use Bootstrap for Your WordPress Theme (And When Not To) and Why Bootstrap is a bad fit for WordPress Themes.

The problem, Bootstrap is not pure semantic and uses predefined presentational CSS classes for layout and other markup, WordPress uses more semantical code by default, but also has its own CSS classes presentation. So Bootstrap CSS classes do not fit WordPress’ HTML code by default. Two way to fix the preceding; change the HTML output of WordPress or applies Bootstrap’s (S)CSS on the default WordPress classes. Also notice that the SCSS code of Bootstrap, Less code for earlier version had been refactored to avoid both extends and child selectors, which means the way you can use this classes become more flexible.

When changing the HTML output of WordPress, people speak about the “nav walker” thing, indeed you have to create a custom nav walker which enables you to display the Bootstrap CSS classes in the HTML code of your page navigation structures. You can download these walkers anywhere. In the JBST theme the following nav walker classes had been used:

<?php 
// Big thanks to Brett Mason (https://github.com/brettsmason) for the awesome walker
class Topbar_Menu_Walker extends Walker_Nav_Menu {

    // add main/sub classes to li's and links(&$output, $item, 
    function start_el( &$output, $item, $depth = 0, $args = array(), $id = 0) {
   
  
    // passed classes
    $classes = empty( $item->classes ) ? array() : (array) $item->classes;
    $class_names = esc_attr( implode( ' ', apply_filters( 'nav_menu_css_class', array_filter( $classes ), $item ) ) );
    
    $active = in_array('current-menu-item', $item->classes);
    $indent = ' ';
    // build html
    $output .= $indent . '<li class="nav-item">';
  
    // link attributes
    $attributes  = ! empty( $item->attr_title ) ? ' title="'  . esc_attr( $item->attr_title ) .'"' : '';
    $attributes .= ! empty( $item->target )     ? ' target="' . esc_attr( $item->target     ) .'"' : '';
    $attributes .= ! empty( $item->xfn )        ? ' rel="'    . esc_attr( $item->xfn        ) .'"' : '';
    $attributes .= ! empty( $item->url )        ? ' href="'   . esc_attr( $item->url        ) .'"' : '';
    if(in_array('current-menu-item', $item->classes)) {
      $attributes .= ' class="nav-link active"';
        $item_output = sprintf( '%1$s<a%2$s>%3$s%4$s%5$s  <span class="sr-only">(current)</span></a>%6$s',
        $args->before,
        $attributes,
        $args->link_before,
        apply_filters( 'the_title', $item->title, $item->ID ),
        $args->link_after,
        $args->after
        );
    }
    else {
      $attributes .= ' class="nav-link"';
      $item_output = sprintf( '%1$s<a%2$s>%3$s%4$s%5$s</a>%6$s',
        $args->before,
        $attributes,
        $args->link_before,
        apply_filters( 'the_title', $item->title, $item->ID ),
        $args->link_after,
        $args->after
        );
    }      

  
    // build html
    $output .= apply_filters( 'walker_nav_menu_start_el', $item_output, $item, $depth, $args );
    }
}
</pre>

As you can see creating “nav walkers” is not that difficult.

In stead of changing the HTML you can also try to change the compiled CSS code. You can take the page pagination as an example. Currently the JBST theme has got a custom function to display the page navigation which result in the HTML like that shown in the code beneath:

<nav style="text-align:center">
  <ul class="pagination">
    <li class="page-item"><a href="http://wordpress/index.php/page/2/" >Previous</a></li>
    <li class="page-item"><a class="page-link" href="http://wordpress/">1</a></li>
    <li class="page-item"><a class="page-link" href="http://wordpress/index.php/page/2/">2</a></li>
    <li class="page-item active"><span class="page-link"> 3 </span></li>
    <li class="page-item"><a class="page-link" href="http://wordpress/index.php/page/4/">4</a></li>
    <li class="page-item"><a href="http://wordpress/index.php/page/4/" >Next</a></li>
  </ul>                   
</nav>        					

The above HTML code for the page navigation contains Bootstrap CSS classes for presentation.

When using WordPress’ built-in function for page navigation as follows:

<?php
the_posts_pagination( array(
    'mid_size'  => 2,
    'prev_text' => __( 'Previous', 'textdomain' ),
    'next_text' => __( 'Next', 'textdomain' ),
) );
?>   

The function call above will generate HTML code like that shown beneath:

<nav class="navigation pagination" role="navigation">
  <h2 class="screen-reader-text">Posts navigation</h2>
  <div class="nav-links"><a class="prev page-numbers" href="http://wordpress/index.php/page/2/">Previous</a>
  <div class="nav-links">
    <a class="prev page-numbers" href="http://wordpress/index.php/page/2/">Back</a>
    <a class="page-numbers" href="http://wordpress/">1</a>
    <a class="page-numbers" href="http://wordpress/index.php/page/2/">2</a>
    <span class="page-numbers current">3</span>
    <a class="page-numbers" href="http://wordpress/index.php/page/4/">4</a>
    <a class="next page-numbers" href="http://wordpress/index.php/page/4/">Onward</a>
  </div>
</nav>  

Now you can code some CSS code which applies Bootstrap’s presentation for the page navigation on the CSS classes above. You SCSS should look like that shown beneath:

// pagination default
.navigation.pagination {
  @include center-block;
  text-align: center; 
  .nav-links {
    @extend .pagination;
    .page-numbers {
      @extend .page-link;
      &:first-child {
        margin-left: 0;
        @include border-left-radius($border-radius);
      }
      &:last-child {
        @include border-right-radius($border-radius);
      }
      &.current {
        @include plain-hover-focus {
          z-index: 2;
          color: $pagination-active-color;
          cursor: default;
          background-color: $pagination-active-bg;
          border-color: $pagination-active-border;
        }
      }
    }
  }
}

As you can see the above SCSS code looks complex and requires deep knowledge of Bootstrap’s SCSS code. Complexity of the SCSS code partially due to the SCSS code requires the .page-links wrapped into .page-item. Refactoring of the pagination component may reduce the complexity of the SCSS code in future, see also Refactor pagination in accordance with the Navs.

After compiling the SCSS code your page navigation will look like that shown in the figure below:

navigation

Both solutions; HTML or CSS change will give you the same result. When using the Sass @extend directive the compiled CSS code will become a little larger, due to having both the original and the extended selector. On the other hand there is no need to change WordPress by adding custom “walkers” and functions. At the moment i’m not sure which way to choose for the JBST 4 theme, i think most people will expect the HTML of the theme contains Bootstrap’s CSS classes.

Implementing Bootstrap with only SCSS / CSS on a bare theme like HTML5 Blank or _s, or underscores seems interesting too. Possible i will create some like “JBST 4 HTML5” theme in future.
Pure semantic HTML5 seems not possible with the Bootstrap Grid’s now, cause the .container wrapper is still required even when the optional flexbox support has been enabled. But you can compile Bootstrap without the predefined CSS grid classes and use the grid mixins to build your responsive layouts.

Also read What’s New in Bootstrap 4, and Happy coding!

Bootstrap 4 meets WordPress

Bootstrap 4 is coming soon! I build a WordPress theme for Bootstrap 4 (alpha release) inspired on the JOINTSWP starters theme. Bootstrap 4 comes with many improvements and new features. Bootstrap 4 is compiled with Sass instead of Less now.

You can download the JBST 4 theme at: https://github.com/bassjobsen/jbst-4-sass/archive/master.zip.

Now you can use Gulp and Sass to build your own custom version:

Install node.js.
Install bower.
Using the command line, navigate to your theme directory
Run npm install
Run gulp to confirm everything is working

Updating Bootstrap for your theme is simple as running bower update in your theme directory now.

Read more about Bootstrap 4 at The Official Bootstrap Blog or read the v4 alpha docs!

Don’t like Sass? Download a CSS only version of the JBST 4 theme at CSS only version

Bootstrap 4 ships with optional flexbox-based grid system and components, download a CSS only with flexbox support of the theme at CSS only version with flexbox support. To compile your own version of the theme with flexbox support you should edit the assets/scss/_variables.scss file and set $enable-flexbox: true;. Run gulp after your changes.Bootstrap 4, JBST 4 preview

Be prepared for Bootstrap v4

The upgrade from Twitter’s Bootstrap 2 to Bootstrap 3 was not painless. The current 3.2.0. release will give you some insights for the coming v4 release of Bootstrap. The 3.2.0. already adds some new things such as the responsive utility classes now have variants for diferents CSS display property values. The most important change till now, seems to be the adding of vendor prefixes to the CSS code automatically.

Responsive utility classes

In stead of the .visible-* classes (deprecated as of v3.2.0) you are now enable to use or .visible-*-block, .visible-*-inline or .visible-*-inline-block. The hidden-* classes don’t change because of they set the display to none always. The .visible-*-inline classes can be used to hide and display inline elements such as the <span> element. Consider the following example code to see the difference:

<p>This is a paragraph. <span class="visible-xs">(Small grid)</span>.</p>
<p>This is a paragraph. <span class="visible-xs-inline">(Small grid)</span>.</p>

As you can see in the image shown beneath, the layout of the paragraph has been broken in the first situation:

Wrong layout of the paragraph due to display:block

The .visible-xs class changed the display of the span element to block. Block level elements start on a new line and take all available space.

Better responsive display for embedded media

Bootstrap adds new classes for embedding media with <iframe>, <embed> and <object> elements. These classes keep the aspect ratio of your media intact when scaling down for different screen widths. With Bootstrap 3.2 you can use the following code:

<!-- 16:9 aspect ratio -->
<div class="embed-responsive embed-responsive-16by9">
<iframe class="embed-responsive-item" src="…"></iframe>
</div>

Try it a find your videos will look great again. Use the .embed-responsive-4by3 class for the 4:3 ratio.

Using autoprefixer as part of build system

The autoprefixer adds vendor prefixes to your CSS code automatically. Using the autoprefixer allows you to only use W3C property declarations in the Less code. More clean and consistent Less code will be the big win here. Note that as also described in my Less Web Development Essentials book:

Vendor-specific rules also provide us with early implementations of standard properties, and alternative syntax.

If you take a look into the <code>/less</code> directory you will find that the mixins are modularized into separate files inside the <code>/less/mixins</code> directory. Before v3.2.0 vendor prefixes where set by mixins. These mixins for vendor prefixes are moved to the less/mixins/vendor-prefixes.less for backward compatibility reasons now. These vendor prefixes are deprecated as of v3.2.0 and will be dropped in v4.

Who used Grunt to build the Bootstrap CSS already will full profit from these change. People who compile the Bootstrap Less code with an other Less compiler for their projects will find some troubles since version v3.2.0. Till v4 new and improved code will not any longer prefixed by Less. Impossibilities in your build process to auto prefix your code automatically will cause non-prefixed CSS in your code base.

To get insight in the consequences of these change you can compare the CSS code build with the Bootstrap build process and the CSS code when compiling with Less directly. Run the following commands in your Bootstrap directory:


>> grunt dist
>> lessc less/bootstrap.less nonprefixed.css
>> diff -b nonprefixed.css dist/css/bootstrap.css

After running the preceding command you will find for instance the following code:

1345c1359,1360
< box-shadow: inset 0 -1px 0 rgba(0, 0, 0, 0.25);
---
> -webkit-box-shadow: inset 0 -1px 0 rgba(0, 0, 0, .25);
> box-shadow: inset 0 -1px 0 rgba(0, 0, 0, .25);

When inspecting the compiled CSS will show you that the box-shadow property for the kbd selector is not prefixed if not using the autoprefixer. The preceding will be due to the Less code for the kbd selector in the less/code.less file does not call the .box-shadow() mixin. Before v3.2.0 not calling the prefixed mixins could be considered as an bug, since v3.2.0 these issues are solved by the autoprefixer automatically. Cause the non mixin calling code will be the prefered code for version 3.2+ and the coming version 4 of Bootstrap this code should not changed any more. Consequently the browser support of the CSS code which has been compiled by Less directly and did not run through the autoprefixer will decrease compared to Bootstrap original CSS code.

The best solution for this issue is to change your build process to enable the autoprefixer as recommended by Bootstrap. Unfortunately some situations can’t be solved this way. Grunt and so the autoprefixer requires Node.js which is not available in some situations. You can read more about this issue in my next post about the JBST WordPress starters theme, which has a built-in Less compiler based on PHP.