Google Customer Reviews and Woocommerce

Google Customer Reviews are available for selected countries now, including The Netherlands and Belgium. At the moment i’m not sure if this service should replace or extend other review services like Trustpilot and The Feedback Company.

To use the Google Customer Review service a is Google Merchant account is required.

To use this service you’ll have to add some JavaScript code to the order confirmation page of your webshop. For Woocommerce you can easily use the woocommerce_thankyou hook to add the JavaScript code. To get the required information of the order you can create a new instance of the WC_Order class inside your custom function of the hook as follows:

$order = new WC_Order( $order_id );

The WC_Order class inherit properties from WC_Abstract_Order which provide you the required information about the customer. Properties for both the customer’s e-mail address and shipping address are available.

The final code for the hook may look like that shown beneath. You can add this code in the functions.php file in your theme directory:

add_action( ‘woocommerce_thankyou’, ‘my_google_reviews’ );
function my_google_reviews( $order_id ) {

// Lets grab the order
$order = new WC_Order( $order_id );
?>
<script src=”https://apis.google.com/js/platform.js?onload=renderOptIn” async defer></script>

<script>
window.renderOptIn = function() {
window.gapi.load(‘surveyoptin’, function() {
window.gapi.surveyoptin.render(
{
“merchant_id”: 11111111,
“order_id”: “<?php echo $order_id; ?>”,
“email”: “<?php echo $order->billing_email; ?>”,
“delivery_country”: “<?php echo $order->shipping_country; ?>”,
“estimated_delivery_date”: “<?php echo my_delivery_date(); ?>”
});
});
}
</script>
<?php
}

As you can see in the above the estimated delivery date value is dynamically set by an other custom function. My custom my_delivery_date() look like that shown below:

function my_delivery_date($send_day = 1) {

if (date(‘N’) === “5” && date(“G”) >= 16) { //vrijdag
$send_day += 3;
}
elseif (date(‘N’) === “6”) { //zaterdag
$send_day += 2;
}
elseif (date(‘N’) === “7”) { //zondag
$send_day += 1;
}
elseif ( date(“G”) >= 16) {
$send_day += 1;
}
return date(‘Y-m-d’,time()+24*60*60*$send_day);
}

The above function is used for my webshops at Webvrouw.nl and Menstruatiecups.nl. For Menstrualcups.eu which has many international orders i can used the same code, after setting $send_day to for instance 3 days.

You can also use the following JavaScript code to set the language of the service.

<!– BEGIN GCR Language Code –>
<script>
window.___gcfg = {
lang: ‘nl’
};
</script>
<!– END GCR Language Code –>

Because of the same code is used to set the language of the badge, i’ve add the language code only to the footer.php file of my theme. The footer.php file also contains the JavaScript code for the Badge. The badge will look like that shown in the figure below:

Badge Google review service

Save

Send an invoice automatically with WooCommerce 2.x

The Question: “WooCommerce only sends invoice when triggered in the Dashboard. How to send these invoice automatically?”. Stackexchange.com WordPress Development does not allow WooCommerce questions any more. That is why i post the answer for this question here.

Add an action to your woocommerce_order_status_completed_notification or woocommerce_order_status_pending_to_processing_notification in functions.php:

function sendinvoice($orderid)
{
    $email = new WC_Email_Customer_Invoice();
    $email->trigger($orderid);
}   

add_action('woocommerce_order_status_completed_notification','sendinvoice');

WordPress theming, the comment_form() call, and the power of Less

When preparing the upload of the next version of JBST to wordpress.org I found the usage of comment_form(). The documentation of comment_form() can be found at Function Reference/comment form. The documentation of comment_form() doesn’t explain why you should have to use this comment_form() call instead of code your comment form’s HTML directly into your comments.php template. On the first sight using comment_form() and setting the comment form field’s HTML by PHP as an function argument or inside a filter, seems the break the MVC principle. Templates should not contain PHP code at all.
Arguments to motivate the usage of comment_form() can be found at WordPress 3.0 Theme Tip: The Comment Form. Standardization is an important argument:

The comment_form function is new to 3.0. Basically, it standardizes the comments form. It makes it wonderful for us plugin authors, since now we can easily modify the comments form with various hooks and things.

When using comment_form() the HTML of the form fields can be set in two different ways, as shown below:

In the first place you can use the comment_form_default_fields filter. The comment_form_default_fields filter return an associative array which contains the HTML for each field as can be seen in the following code:


add_filter( 'comment_form_default_fields', function(){ 

	$commenter = wp_get_current_commenter();
	$req = get_option( 'require_name_email' );

	return array(

    'author' =>
      '<div class="form-group">
			  <label for="author">' . __("Name",'jamedo-bootstrap-start-theme')
			 . ($req ? " (". __("required",'jamedo-bootstrap-start-theme') .")" : '')
			 . ' </label>
			  <div class="input-group">
			  	<span class="input-group-addon"><i class="glyphicon glyphicon-user"></i></span>
			  	<input class="form-control" type="text" name="author" id="author" value="'
			  	. esc_attr($commenter['comment_author']). '" placeholder="'
			  	. __("Your Name",'jamedo-bootstrap-start-theme'). '"'
			  	. ($req ? ' required aria-required="true"' : ''). '/>'
			  . '</div>'
		  	. '</div>',

    'email' =>
      '<div class="form-group">
			  <label for="email">' . __("Email",'jamedo-bootstrap-start-theme')
			 . ($req ? " (". __("required",'jamedo-bootstrap-start-theme') .")" : '')
			 . ' </label>
			  <div class="input-group">
			  	<span class="input-group-addon"><i class="glyphicon glyphicon-envelope"></i></span>
			  	<input class="form-control" type="email" name="email" id="email" value="'
			  	. esc_attr($commenter['comment_author_email']). '" placeholder="'
			  	. __("Your Email",'jamedo-bootstrap-start-theme'). '"'
			  	. ($req ? ' required aria-required="true"' : ''). '/>'
			  . '</div>'
			  . '<span class="help-block">'. __("will not be published",'jamedo-bootstrap-start-theme'). '</span>'
		  	. '</div>',

    'url' => '<div class="form-group">
			  <label for="author">' . __("Website",'jamedo-bootstrap-start-theme')
			 . ' </label>
			  <div class="input-group">
			  	<span class="input-group-addon"><i class="glyphicon glyphicon-user"></i></span>
			  	<input class="form-control" type="url" name="url" id="url" value="'
			  	. esc_attr($commenter['comment_author_url']). '" placeholder="'
			  	. __("Your Website",'jamedo-bootstrap-start-theme'). '"'
			  	. '/>'
			  . '</div>'
		  	. '</div>'
    );}
  );

Secondly, the comment form field’s HTML can set with the array which is passed as an argument to comment_form() as follows:


$args = array ('fields'=> array('author' => '<input id="author" type="text" name="author" />'));
comment_form($args);

Please notice that the value of fields overwrites the settings of the comment_form_default_fields filter. The preceding code don’t set an email or url field which means the comment form won’t have these field too.

When using comment_form() in your templates you don’t have to code the different situations where the user is logged in or not, where the comments are open or closed, and so on. On the other hand you still have to code the function’s argument or filters as shown in the preceding.

Popular themes such as “Twentythirteen” use the comment_form() code which enables (plugin) developers to change the look and feel of the comment form with filters or CSS. In this standard situation theme coders only have to write comment_form() in the comments.php template and style the form with CSS.

WooCommerce

The WooCommerce Plugin uses the comment_form() code to build a review form. The code to create the review form will like that shown as in the following code:


comment_form( apply_filters( 'woocommerce_product_review_comment_form_args', $comment_form ) );


The additional woocommerce_product_review_comment_form_args filter adds extra flexibility for theme and plugin developers. In the following figure you will see how WooCommerce default review form will look:

WooCommerce's review form

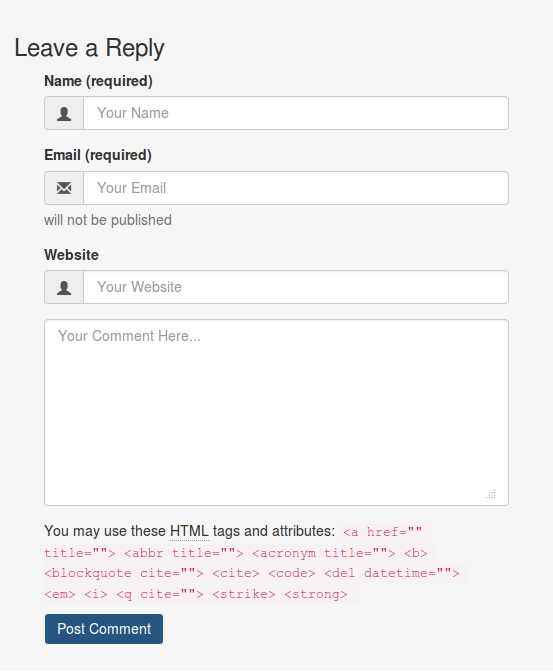
JBST’s comments form

For JBST the comments form should be build with Bootstrap’s form classes and structures as can be found at: . To change the default input fields I use comment_form_default_fields filter as shown earlier in this text. Other changes are set by the argument passed to the comment_form() function as shown in the following code:


	comment_form(

			apply_filters ('jbst_comments_form_arguments', array('comment_notes_before' => '',
			'comment_field' => $comment_field,
			'title_reply' => $title_reply))
	);


The comment_form() function has no filters to change the submit button. You can change the text and the ID of the submit button with the argument array, but are not enable to change the HTML of the button (input type="submit"). The submit button can be styled with CSS. To style the submit button in JBST Bootstrap’s button classes are used. This button classes can be applied easily with Less. JBST has a built-in Less compiler. To style the submit button with Bootstrap’s button classes I use the Less code as follows:


#commentform {
	input[type="submit"] {
	&:extend(.btn all, .btn-primary all);
	}
}	


The .btn-primary button style class is variable in JBST, so the final Less code in PHP will look like the following:


#commentform {
	input[type="submit"] {
	&:extend(.btn all, .'.get_theme_mod( 'default_button_style', 'btn-primary' ).' all);
	}
}	


The following figure will show you how JBST comments form will look after the changes described in the preceding:

JBST's comment form


Upgrading to Woocommerce 2

At the request of Jamedo Websites I upgrade the webshop of webvrouw to Woocommerce 2 last week. The upgrade broke my styles on the first sight. After taking a look to the css-files i found Woocommerce functions should be wrap with a woocommerce class now.

Be sure to wrap <?php woocommerce_content(); ?> in a <div class="woocommerce"></div> tag in your theme.

This new css gives also problems when using star-rating and the woocommerce-lightbox. See: Star rating bug.

ShareYourCart integration

After the upgrade the ShareYourCart settings were lost. Also ShareYourCart gives a warning on the checkout page.
Warning: call_user_func_array() expects parameter 1 to be a valid callback, class 'ShareYourCartWooCommerceEx' does not have a method 'showCheckoutButton' in

Update: After updating ShareYourCart to the latest version (1.11.7) the problem with the check-out page is solved. ShareYourCart isn’t a integrated part of Woocommerce any more. ShareYourCart works like any other plugin now.

Integrate Trustpilot’s Automatische Feedback Service With Woocommerce

Try the WooCommerce Trustpilot Plugin now. This plugin sends the Trustpilot’s BCC email after order processing or completing.

Trustpilot is an open, community-based platform for sharing real reviews of shopping experiences online. You can use Trustpilot with your web shop. To ask customs for reviews Trustpilot sends e-mails. When you open a account you get a unique (secret) e-mail-address to send your order information to. Trustpilot’s software scans this e-mails for the e-mail-address of customer and your orderID. Trustpilot use this information to ask your customers for reviews.

With Automatische Feedback Service e-mails are send directly after the order. You can do this by sending a Bcc (blind carbon copy) of your confirmation e-mail to your unique Trustpilot e-mail-address. Woocommerce has no setting to send such Bcc message by default. To send you blind copy you have to change the code of Woocommerce.

Find the file /wp-content/plugins/woocommerce/classes/class-wc-email.php on your webserver first. Trustpilot ask you to send your order conformation e-mail. Woocommerce also sends an order complete message. I use the order complete message to send the blind copy. In the file mentioned before look up the customer_completed_order function. If you prefer to send the blind copy with the confirmation use the customer_processing_order function.

customer_completed_order contain the line:
$headers = apply_filters('woocommerce_email_headers', '', 'customer_processing_order', $order);

Add the following line of code after this line (replace xxxx@trustpilotservice.com with your own unique e-mailaddress):
$headers .= 'Bcc: xxxx@trustpilotservice.com'."\r\n";

That’s all. Remember this solution isn’t a hook for Woocommerce so you have to repeat this steps when you update your Woocommerce plugin every time.

Update for Woocommerce 2 In Woocommerce 2 the structure of the mail class has been changed. To send your Bcc message to Trustpilot you have to add the email address to /wp-content/plugins/woocommerce/classes/emails/class-wc-email-customer-completed-order.php or wc-email-processing-order.php if you like. The function trigger calls $this->send() change the fifth parameter from $this->get_headers() to this->get_headers().'Bcc: xxxx@trustpilotservice.com'."\r\n".